
It is crucial to keep any firearm you own in good working condition. You’ll want to be sure to field strip a Glock pistol and clean your weapon after every time you fire it. Even if you never fire your weapon, you still want to clean it at least once a year.
Why Field Strip Your Glock?
If you own a Glock pistol, then it is highly likely it enters into your self-defense strategy. Because the stakes are life and death – pistol maintenance needs to be part of your routine. You do not want to discover that corrosion or residue build-up have harmed its functionality when it is too late!
Those Austrians know how to design a very simple firearm, so learning how to field strip and reassemble a Glock pistol in five minutes or less is extremely easy. You don’t even need any tools! Just follow these easy steps and practice a few times, and you’ll soon be able to boast expertise like a real operator.
Before you begin, remember to keep your workspace clean and free of distraction. Also, take a moment to review Colonel Jeff Cooper’s first two rules of firearm safety: All guns are always loaded, and never let the muzzle cover anything you are not willing to destroy.
How to Field Strip a Glock Pistol
1. Eject the Glock magazine. Pull back on the slide, then use your slide lock to hold it in the open position. Visually and physically inspect the Glock pistol’s chamber to make certain it is empty and not loaded. Make sure you keep your fingers away from the trigger while completing this crucial first step.
2. Release the slide lock to return the slide into battery. Keep your hand on the slide for better control over it during this process. Having made certain the pistol is unloaded, it is now safe to pull the trigger and release the firing pin. Point the muzzle in a safe direction as you do this.
3. For this step you will need to be able to pull back on the slide while manipulating the slide release mechanism. Depending on the size of your hands, this step requires you to find a specific way to securely grip the pistol before continuing disassembly.
Standard Slide Disassembly Method

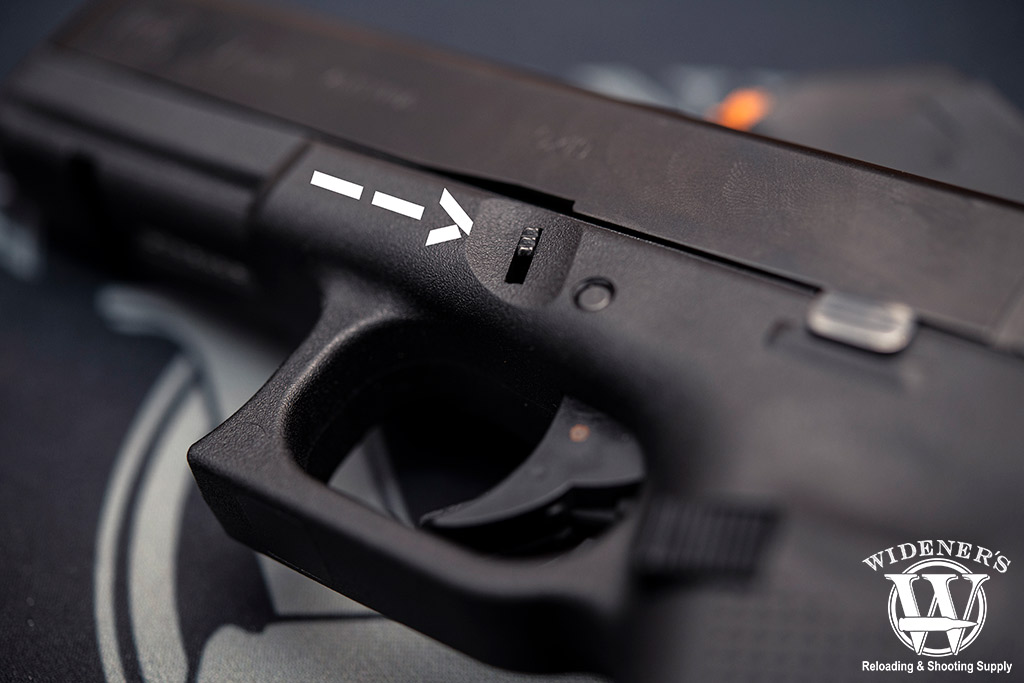
Be sure to pull down on both sides of the slide release simultaneously when field stripping your Glock pistol.
Grip the rear of the pistol with your hand around the slide and your thumb locked into the backstrap. Squeeze the slide in your hand, pulling it backward until you feel it move out of battery past the lip of the ejection port. Then pull straight down on both sides of the slide release with your thumb and forefinger. Finally, release the slide and pull forward on it with your free hand to fully remove the slide from the frame.
Alternative Slide Disassembly Method
If you have trouble racking the slide, you can hook the rear pistol sights on your belt or a solid surface like a tabletop. Push down, pulling the slide back and engaging the slide lock with your thumb. Pull down on the slide release mechanism and then release the slide lock. Pull the trigger and then push forward on the slide to remove it from the frame of the pistol.
4. With the slide completely removed, you may now set aside the pistol’s one-piece frame. Turn the underside of the slide to face you with the barrel facing down. Three main parts comprise the upper of a Glock pistol: slide, barrel, and recoil spring assembly. In the next step you will remove the recoil spring assembly from the slide.
5. Press down firmly on the circular metal end of the guide rod. Pull the recoil spring assembly forward until you have freed it from the slide assembly. Place the recoil spring assembly to the side.
6. Place your index finger on the tab of the barrel lug. Pull back to remove the barrel from the slide.
The Glock pistol is now completely field stripped and ready for cleaning or reassembly.
How to Reassemble a Glock Pistol
1. To put your Glock pistol back together, begin with the barrel. With the bottom of the slide facing toward you, insert the barrel muzzle first into the slide. Push the barrel back until it locks into alignment with the ejection port. You can check the alignment by pressing forward on the barrel lug.
2. Insert the recoil spring assembly by placing the plastic end into the opening below the muzzle. Press firmly on the circular metal end of the guide rod, pushing it down into the second cutout on the barrel lug. Make sure the recoil spring assembly is centered and in good alignment with the barrel.
3. The slide and frame are now ready for reassembly. Begin by aligning the rails of the slide with the guide rails on the frame. Pull the slide back past the locking block until the trigger assembly begins to engage. Continue pulling the slide until it is all the way back in position. With your hand on the slide for control, let the spring return the slide into battery. This will lock the slide back in place on the frame. The pistol is now reassembled.
4. Safely perform a function test to ensure the pistol is working correctly. With the muzzle pointed in a safe direction, pull the trigger to release the firing pin. Rack the slide again, and then pull the trigger once more to confirm the pistol is functioning correctly.
If everything functions satisfactorily, you are ready to go!
Glock Pistol Maintenance

Knowing how to field strip your Glock pistol is an important part of being a responsible gun owner.
We can not overemphasize the importance of safety while field stripping your pistol. If you do only one of these steps correctly, make sure it is the very first one: remove your magazine, confirm your chamber is empty, and keep your fingers away from the trigger in the process. Performing firearm maintenance is part of being a responsible gun owner. When you are ready for a reload, be sure to check out the great prices on pistol ammunition and accessories at Wideners.com!


